Essential Gear for Capturing Murmurations
When it comes to photographing starling murmurations, having the right gear is half the battle.
You’ll need a camera and lens combo that can handle the low-light conditions and fast movements of the birds.
Camera and Lens Options
Camera: A DSLR or mirrorless camera is your best bet.
These cameras typically offer better ISO performance, meaning they can handle low light without producing too much noise.
High ISO capability is crucial because murmurations often occur at dusk when light levels are low.
Look for a camera with a wide ISO range and good noise control at higher settings.
Lens: You don’t need a super telephoto lens.
Instead, a standard zoom lens (like a 24-70mm) or an all-in-one zoom lens (like an 18-200mm) works well.
These lenses offer flexibility, allowing you to zoom in and out as needed.
A fast lens with a wide aperture (f/2.8 or lower) is beneficial for capturing clear images in low light.
This wide aperture lets in more light, enabling faster shutter speeds.
For those who want to capture the whole scene, a wide-angle lens is a great addition to your kit.
It allows you to photograph the entire murmuration, showing the vast, swirling patterns the birds create.
How to Find the Birds – Tips and Tricks
Birdwatching can be exciting and challenging. For those interested in learning how to find the bird tips and tricks, this…
The Role of Tripods
Tripods are essential for photographing starling murmurations, especially in low light.
When the light fades, your shutter speed will need to slow down to allow enough light to hit the sensor.
Without a tripod, even the slightest movement can result in blurry photos.
A sturdy tripod keeps your camera steady, ensuring sharp images.
Choosing a Tripod: Look for a tripod that is easy to set up and adjust.
You want something that is stable but not too heavy to carry around.
Some tripods come with a hook at the bottom of the center column where you can hang your camera bag for extra stability in windy conditions.
Using a ball head on your tripod can make it easier to adjust your camera’s position quickly.
This flexibility is helpful when you’re trying to follow the fast-moving starlings.
Optimal Camera Settings
Getting your camera settings right is crucial for capturing sharp and vibrant images of starling murmurations.
You’ll need to balance shutter speed, ISO, and exposure to deal with the changing light conditions at dusk.
How to Find the Birds – Tips and Tricks
Birdwatching can be exciting and challenging. For those interested in learning how to find the bird tips and tricks, this…
Shutter Speed and ISO
Shutter Speed: Start with a shutter speed between 1/125sec and 1/250sec.
This range is fast enough to freeze the motion of the birds without introducing too much blur.
However, if you’re looking for an artistic effect, experimenting with slower shutter speeds can create beautiful motion blur, showcasing the fluid movement of the murmuration.
ISO: Adjusting your ISO settings is necessary to get a good exposure in low light.
Start with a low ISO (like 100 or 200) and gradually increase it as the light fades.
High ISO settings can introduce noise, so find the sweet spot where you get enough light without compromising image quality.
Most modern cameras handle ISO 800 to 1600 quite well, but it varies by model.
Pro Tip: Use the auto ISO feature if your camera has it.
Set a maximum ISO limit that you are comfortable with, and let the camera adjust the ISO as needed while you focus on getting the composition right.
Adjusting Exposure for Dusk
Exposure Compensation: As the light changes rapidly during dusk, keeping an eye on your exposure is essential.
Use your camera’s exposure compensation feature to adjust the brightness of your image.
If your photos are too dark, dial in positive exposure compensation.
If they are too bright, go negative.
Metering Mode: Switch to spot metering to ensure the birds are correctly exposed.
This mode measures the light in a small area of the frame, usually where the birds are, giving you more control over the exposure.
Histogram: Keep an eye on the histogram.
This graph shows the distribution of light in your image.
Aim for a balanced histogram without spikes at the edges, which indicate blown highlights or lost shadows.
Adjust your exposure settings to keep the histogram’s peaks within the middle range.
How to Find the Birds – Tips and Tricks
Birdwatching can be exciting and challenging. For those interested in learning how to find the bird tips and tricks, this…
Composition and Positioning
How you compose your shots can make or break your photographs of starling murmurations.
Paying attention to background, framing, and positioning will help you capture stunning images.
Background and Framing
Background: A clean background helps the starlings stand out.
Look for a clear sky or a simple landscape that doesn’t distract from the birds.
Avoid cluttered backgrounds with lots of trees or buildings.
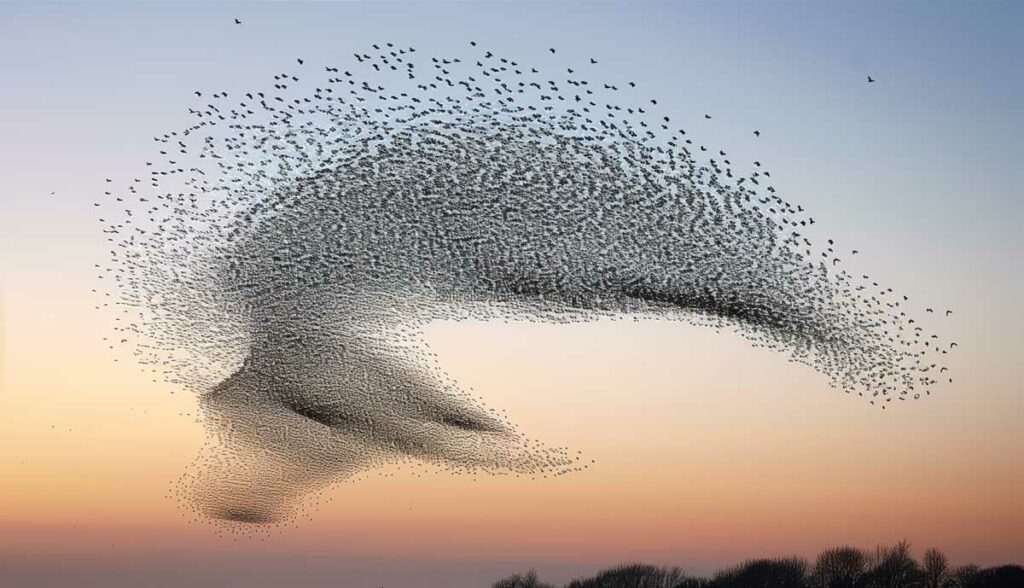
A plain background emphasizes the movement and shape of the murmuration.
Framing: Think about how you frame your shots.
Use the rule of thirds to place the murmuration off-center for a more dynamic composition.
This technique draws the viewer’s eye into the scene and creates a sense of movement.
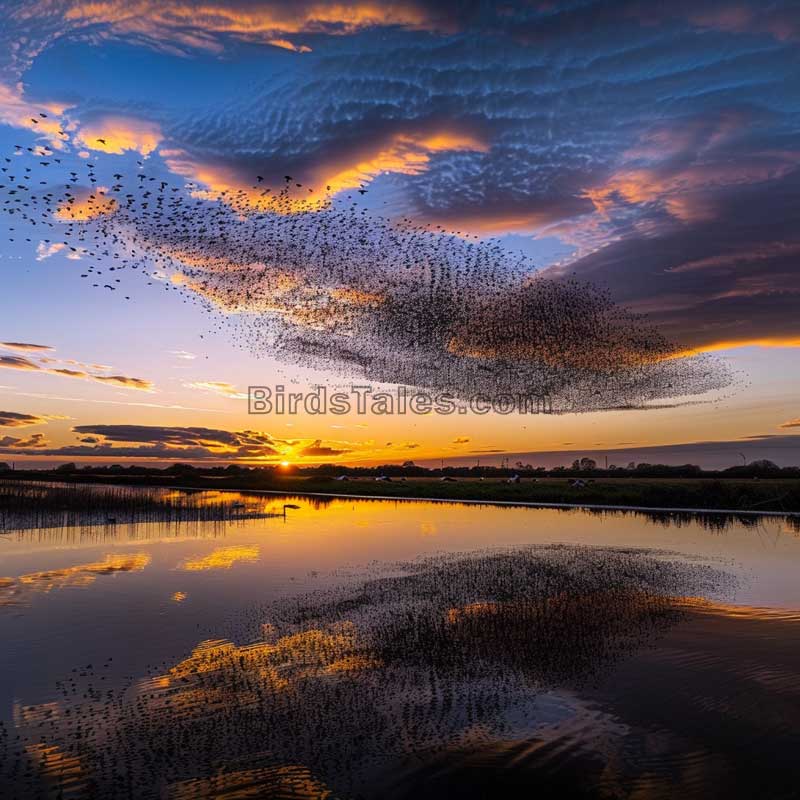
Wide-Angle Shots: Use a wide-angle lens to capture the full scale of the murmuration.
This perspective shows the vast number of birds and the patterns they create in the sky.
Position yourself where you can get an unobstructed view of the horizon, giving the murmuration plenty of space in the frame.
Zoom Shots: For closer shots, use a zoom lens to focus on smaller sections of the flock.
These images can highlight the density and detail of the murmuration, capturing individual birds within the mass.
Capturing Motion and Form
Motion Blur: Experiment with slower shutter speeds to introduce motion blur.
This technique can create beautiful, abstract images that convey the fluid movement of the birds.
Start with a shutter speed around 1/60sec and adjust based on the light and desired effect.
Freezing Action: If you prefer to freeze the action, use faster shutter speeds.
This approach captures the sharp, intricate details of the birds in flight, showcasing their patterns and formations.
Try different settings and review your shots to see what works best.
Composition Tips: Use leading lines in your composition.
Look for natural lines in the landscape, like rivers or roads, that lead the viewer’s eye toward the murmuration.
This technique adds depth and interest to your photos.
Timing and Location
Knowing when and where to photograph starling murmurations is just as important as having the right gear.
Timing and location can significantly affect the quality of your shots.
Best Times for Photography
Dusk: The best time to photograph murmurations is during dusk.
The light is soft, and the birds are most active as they return to their roosts.
Arrive at least an hour before sunset to set up and find the best spot.
Be prepared to stay until after the sun goes down, as the best action often happens when the light is low.
Weather Conditions: Calm weather is ideal for photographing murmurations.
Wind can scatter the birds and disrupt the patterns they create.
Check the weather forecast and choose a calm, clear evening for your shoot.
Season: Starling murmurations typically occur in late autumn and winter.
In the UK, for example, the best months are from October to January.
Check local resources to determine the best time of year for murmurations in your area.
Finding Prime Locations
Research: Start by researching known murmuration sites.
Websites, local birdwatching groups, and forums can provide valuable information on where and when murmurations occur.
Many regions have popular spots where starlings gather each year.
Scouting: Visit potential sites ahead of time to scout the best vantage points.
Look for open areas with clear views of the sky and minimal obstructions.
Pay attention to the direction of the sunset, as this will affect the lighting in your photos.
Local Advice: Talk to local birdwatchers or photographers.
They often have insider knowledge on the best locations and times to catch the action.
Building a network of contacts can provide ongoing tips and updates.
Ethical Photography Practices
When photographing wildlife, it’s important to do so responsibly.
Your presence should not disturb the natural behavior of the birds.
Respecting Wildlife
Be Quiet: Avoid loud noises and sudden movements that could startle the birds.
Keep your distance and use a long lens if you need close-up shots.
Starlings are sensitive to disturbances, and respecting their space ensures they continue their natural behavior.
Stay Hidden: Blend into your surroundings as much as possible.
Wear neutral clothing and avoid using bright colors or reflective gear that might catch the birds’ attention.
Leave No Trace: Always leave the site as you found it.
Take all your litter with you, and avoid damaging the environment.
Respecting nature ensures these beautiful phenomena can be enjoyed by others in the future.